DIY Tips
8 DIY Ideas to Transform Your Backyard on a Budget
Renovating your backyard can breathe new life into your outdoor area. It’s more than just aesthetic improvement.
By using your creativity and our budget-friendly ideas, you can give your outdoor space a makeover that will impress your neighbours and make them envious.
A few cheap backyard ideas can turn basic green space into the ultimate outdoor retreat.
No matter if you’re a seasoned gardener or a beginner, these incredible tips and tricks will guide you in creating the perfect DIY backyard decor, all while embracing the “Transform Your Backyard on a Budget” concept.
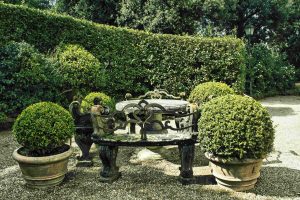
Add Potted Plants
One fantastic way to add charm and life to your outdoor space is by incorporating potted plants.

- Choose low-maintenance plants – Choose potted plants that require minimal care and retain their beauty throughout the year. Succulents such as Aloe Vera or Jade are perfect choices as they are hardy, drought-tolerant, and come in various sizes and colours. Additionally, consider perennials like lavender or ornamental grasses that are easy to maintain and add texture to your backyard.
- Repurpose household items as planters – Instead of splurging on expensive pots, get creative with your DIY backyard decor. Utilise old terracotta pots, tin cans, buckets, or even shoes as unique planters. Add a fresh coat of paint, decorate them with patterns or decoupage, and transform them into eye-catching pieces of art.
- Create a vertical garden – If you have limited space but still want to add greenery, vertical gardening is the way to go. Upcycle wooden pallets, hanging shoe organisers, or even repurpose an old ladder to create a stunning vertical garden. Fill each compartment or plank with small potted plants or herbs, adding a touch of green to your backyard while making the most of your available space.
- Grow herbs and vegetables – Herbs and vegetables add visual appeal, they also provide a fresh and delicious addition to your meals. Create a delightful outdoor seating area by planting small pots of herbs such as basil, rosemary, or mint. Strategically position them for effortless access when preparing delicious meals or concocting refreshing drinks.
- Hang planters – Display beautiful flowers or trailing plants like petunias, ivy, or ferns in colourful hanging baskets to create a vibrant and cascading look. You can also repurpose old metal baskets or create DIY macramé hangers for a boho-chic touch.
- Incorporate a mix of heights and textures – Mix tall, medium, and trailing plants together to create multidimensional display. Combine different leaf shapes, colours, and textures to make your backyard transformation visually satisfying and captivating.
Install new lighting

- Map out your backyard area and consider where you want your lighting fixtures to be placed. Identify key focal points such as pathways, seating areas, or landscaping features, and determine the type of lighting best suited for each location.
- Choose cost-effective lighting options, such as solar-powered lights as they are environmentally friendly in nature and the fact that they don’t need wiring or electricity. LED lights, for instance, are energy-efficient and have a much longer lifespan compared to traditional incandescent bulbs. This not only saves you money on electricity bills but also on replacement costs.
- Many lighting fixtures have easy installation instructions and there are online tutorials to help you. Remember to prioritise safety and consult an electrician if you’re unsure about any electrical work.
- Enhance your lighting with the versatility of string lights to light up your pergola or patio during gatherings and serve as a decorative element when not in use.
- Use accent lighting to create a cosy atmosphere as soft lighting on trees or colourful lanterns can add depth and visual interest to your space.
- Invest in smart lighting technology to control outdoor lights remotely, save energy, and customise lighting for different occasions and moods.
Paint Outdoor Furniture
This DIY trick helps personalise your backyard decor and turns old furniture into stylish pieces that match your outdoor design.


- Before you begin, evaluate the condition of your outdoor furniture. Scrub away any dirt or debris and repair any damaged or loose parts. Sand down rough surfaces and remove any peeling or chipped paint. A clean and smooth surface is crucial for achieving a professional-looking finish.
- Look for exterior-grade paints that are specifically formulated for outdoor use. These paints are designed to withstand the elements and provide a durable finish. Pick paints that offer UV protection to prevent fading. Consider using a paint sprayer for large-scale projects or a brush for intricate details.
- Decide on a colour scheme that complements your backyard design and personal style. Neutral tones like whites, greys, and blacks can create a timeless look, while bold hues can add vibrancy and personality. Don’t be afraid to mix and match colours or experiment with patterns for a unique touch.
- By applying a layer of primer before painting, you enhance adhesion, extend the lifespan of your paint job, and create a smooth and flawless foundation for your desired paint colour. Choose a primer that matches the material of your furniture, such as metal primer for metal surfaces or wood primer for wooden furniture.
- Invest in high-quality brushes and tools that suit the type of furniture you’re painting. Different surfaces may require different applicators, such as foam brushes for intricate details, angled brushes for corners, or roller brushes for larger areas. Using the right tools will ensure a smoother and more professional-looking finish.
- Instead of applying one thick coat, try applying multiple thin coats of paint. This technique helps achieve better coverage, prevents drips, and allows for easier touch-ups if necessary. Allow each coat to dry thoroughly before applying the next.
- Apply a sealant after the paint dries to protect your newly painted furniture from moisture, UV rays, and wear and tear. This extra layer of protection can extend the lifespan of your furniture’s new finish.
To complete your transformation, add colourful cushions, outdoor rugs, potted plants, or string lights to create a cosy and inviting atmosphere in your upgraded backyard.
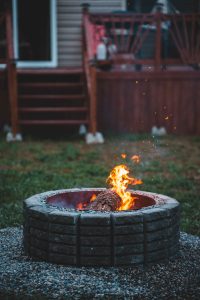
Create a fire pit
Creating a fire pit elevates the ambience of your outdoor area. Not only does a fire pit provide warmth and light, but it also provides an excellent focal point for gatherings with friends and family.

- When choosing the location for your fire pit, make sure to consider the size and layout of your outdoor space. It should be placed at a safe distance from any flammable objects or structures. Additionally, factor in wind direction to avoid smoke blowing towards your seating area.
- Building a fire pit on a budget doesn’t mean sacrificing style. Look for affordable materials such as concrete pavers, bricks, or natural stones, which can create a beautiful and durable fire pit.
- DIY projects offer greater customisation and cost savings, but pre-made kits provide convenience as they come with all the necessary components and instructions.
- Improve safety measures by surrounding the pit with non-combustible material like gravel or sand. Also, create a protective barrier to avoid accidental contact with the fire. Always check local regulations and obtain any necessary permits before constructing your fire pit.
- Remove ashes, debris, and any leftover firewood after each use. Regular maintenance not only extends the lifespan of your fire pit but also ensures a safe and enjoyable experience for everyone.
Build a pergola
Building a pergola adds an appealing architectural element to your outdoor area, at the same time providing a shaded retreat for relaxation and entertainment.
- Plan and Design: Consider the size and location that would best suit your backyard. Sketch out the layout, keeping in mind any existing structures or elements you want to incorporate. This initial planning stage will ensure a smooth construction process and a visually appealing end result.
- Choose Cost-Effective Materials – Pressure-treated or cedar lumber offers durability and a natural aesthetic without the hefty price tag. For an eco-friendly touch, go for repurposed or salvaged materials, such as reclaimed wood or recycled materials.
- DIY vs. Professional Help: If you have the necessary skills and tools, taking the DIY route can save you significant amounts of money. However, if you’re unsure or lack the time and expertise, investing in professional help ensures a high-quality pergola while avoiding potential costly mistakes.
- Research Local Regulations: Research and understand any local regulations or permits required for building a pergola. Compliance with codes and regulations will help avoid costly fines or having to redo any work that doesn’t meet the necessary standards. Building within the guidelines will save you both time and money in the long run.
- Include budget-friendly Shades: Instead of expensive custom shades, consider using cost-effective alternatives such as hanging fabric curtains, outdoor blinds, or inexpensive shade sails. These options provide flexibility, allowing you to adjust the amount of shade based on the time of day and your specific needs.
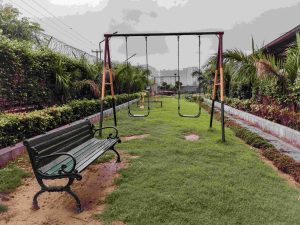
Build a playground

- Check local classified ads, online marketplaces, or yard sales for used equipment in good condition. You can also find DIY playground kits or plans online that can help you save money.
- You can repurpose materials in creative ways. For example, old tires can be made into swings, wooden pallets can be used to build a climbing wall, and PVC pipes can be turned into water features. Think outside the box and explore unconventional materials that can be repurposed.
- Gather a team of friends or family members and make it a fun project. Remember to prioritise safety and follow any necessary guidelines or regulations.
- Use sturdy and durable materials, secure all fasteners tightly, and cushion the ground with mulch, rubber mats, or sand. Regularly inspect and maintain the playground for any repairs or replacements needed.
- Use trees for shade, arrange rocks for climbing, or create a small garden area nearby. These added natural features not only enhance the appearance but also provide additional play opportunities.
- Create a playground that can be enjoyed by children of various ages and interests. Include a diverse range of activities such as swings, slides, climbing structures, and sensory elements. Versatile playgrounds accommodate a wider range of play styles and can be enjoyed for years.
- Paint vibrant colours by incorporating your child’s favourite themes, or hang up some outdoor decorations. These little touches can make a big difference in creating an enjoyable and personalised space.
Install a fence
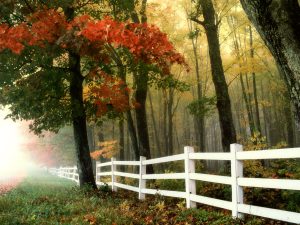
- Requirements: Consider the height, materials, and style of the fence that best suits your backyard’s aesthetic and your privacy preferences.
- Cost-effective materials: Fence materials like pressure-treated wood, vinyl, or chain link provide durability while being relatively affordable compared to other alternatives.
- Local regulations: Ensure that you are aware of local building codes and regulations regarding fence height, design, and placement. This knowledge will help you avoid any unnecessary fines or issues during and after the installation process.
- Collaboration – If you share a fence line with neighbours, collaborate with them to split the cost. This arrangement can help both parties save money while ensuring a consistent and uniform appearance throughout the neighbourhood.
- Price comparision – Before buying materials, compare prices from different suppliers or hardware stores. This comparison can lead to finding the most affordable option, allowing you to stay within your budget.
- Recycled materials – Consider using reclaimed or recycled materials, such as salvaged wood, for a unique and eco-friendly touch. Not only is this option cost-effective, but it also adds character and charm to your backyard.
- Maintenance: Proper maintenance can prolong the lifespan of your privacy fence, reducing the need for costly repairs or replacements in the future. Regularly inspect for damage, apply protective coatings, and trim any vegetation that may affect its stability.
Create a seating area
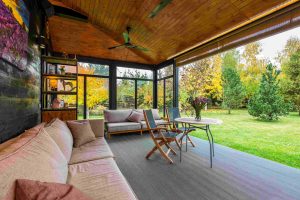
- Repurpose pallets – Arrange the pallets side by side, secure them together, and repaint or stain to match your desired aesthetic. Add cushions or outdoor pillows for comfort.
- DIY cinder block benches – Stack the blocks, preferably in an alternating pattern, and place wooden or stone slabs on top for seating. This simple and cost-effective solution provides ample seating space.
- Repurpose tree stumps – Place a sturdy wooden board across the top of multiple stumps for a rustic and charming seating area. Consider sanding and sealing the wood for longevity.
- Hang a hammock – Hammocks offer a relaxing seating option that can instantly transform your backyard. Choose a hammock that fits within your budget and securely attach it between two sturdy trees or using a hammock stand.
- DIY benches from old chairs – Upcycle, paint or stain old chairs to match your outdoor theme and add cushions or pillows for comfort. This creative solution adds a touch of whimsy to your seating area.
- Outdoor rugs – Choose a rug that complements your backyard’s colour scheme and place it beneath your seating furniture. This simple addition adds warmth and style to the space.
Make an outdoor swing using a wooden pallet. Make sure to hang it securely from a robust and stable support. Add cushions or pillows for extra comfort. Enjoy a budget-friendly and unique swing in your backyard.
Expert PRO tip!
Always remember that sometimes less is more. A neatly mowed lawn with well-trimmed edges often looks just as good as an elaborate landscape design.
Pingback: Home Renovation on a Budget – DIY Tips for a Fresh Look - Digital Daily News - Australia's Digital News Agency